Basic Sourdough Bread
“This post may contain affiliate links*. If you decide to purchase through my links, I will get a small commission at no extra cost to you. Read the full disclosure here. “
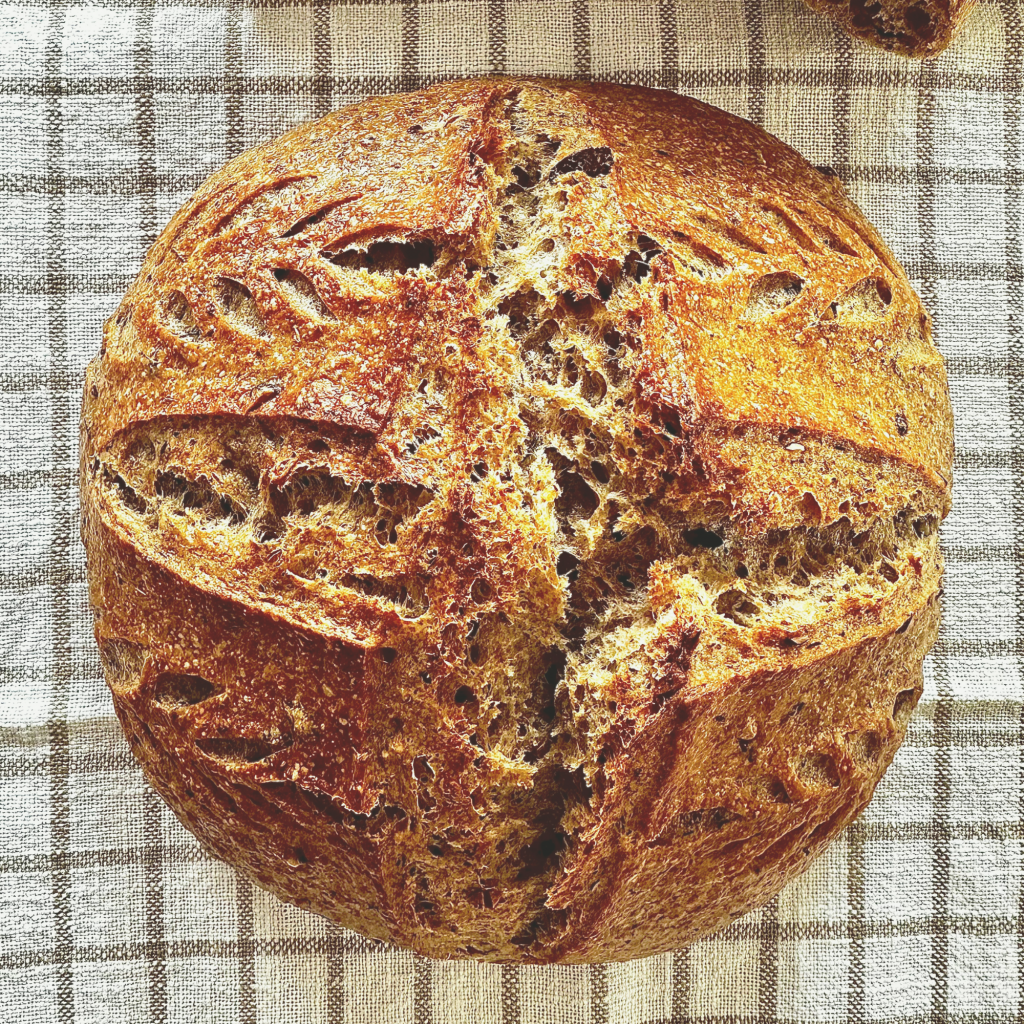
Baking sourdough bread with a sourdough starter is a traditional and slow-living alternative to modern baking. Although the results look alike with the help of commercial yeast, the texture, smell, taste, and gut friendliness couldn’t be more different.
If you decide to bake your bread with sourdough, I highly recommend reading my blog post about ‘how to make a sourdough starter’. Also, be prepared to plan a lot more time for the baking preparations since baking with a sourdough starter is an act of patience and love for recipes from scratch.
2x 1kg bread loaves
Ingredients
400g of whole spelt flour
600g of spelt flour type 630 or 1050
25g salt
650g water
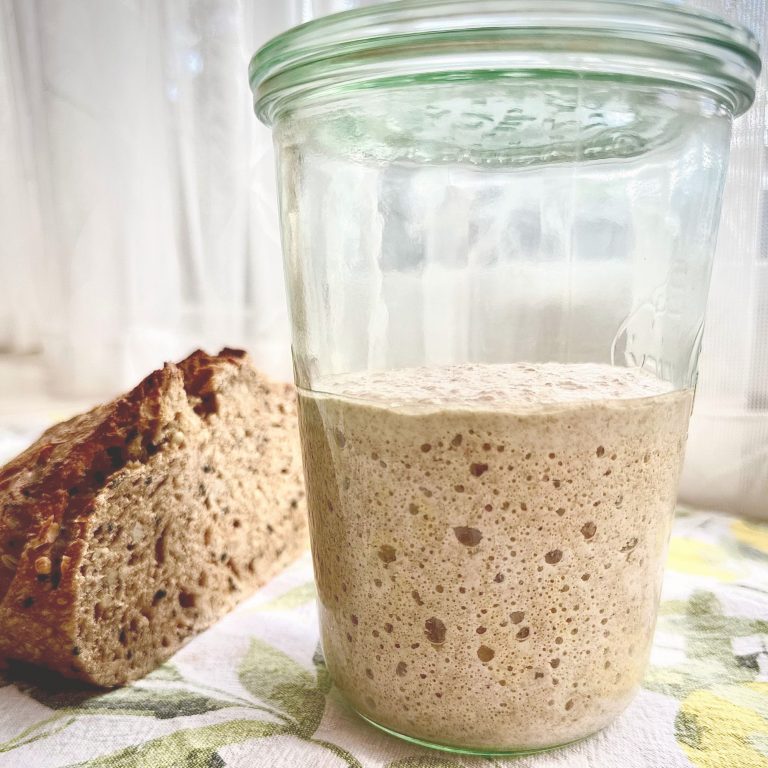
200g active and bubbly sourdough starter
Equipment
Hand mixer* or food processor*
Method
Step 1
You feed your sourdough starter in the evening the day before the preparations, so two days before you plan on baking your sourdough bread loaves. Leave your fed sourdough starter overnight at room temperature (20 – 24°C) on the kitchen countertop.
Step 2
The next day, in the morning, around 6 to 8 a.m., feed only 100-200g of the sourdough starter again—with equal amounts of flour and water. The rest of yesterday’s sourdough starter is considered discard (you can use it for discard recipes like waffles, pancakes, etc.).
Remember that you’ll need at least 300g of active sourdough starter for this specific recipe to work with—200g for your loaf and 100g for future maintenance.
Within the next six to eight hours, so around 2 to 4 p.m., your sourdough starter should double in size and get very bubbly and active. This is the perfect time to start the baking process!
Step 3
Combine 400 g of whole grain flour and 600g of white flour in a bowl. Add 650g of water and 25g of salt and mix everything until it becomes a dough.
Your dough will initially have a dryish texture and be hard to handle. This is normal since we’ll add the sourdough starter later, adding more moisture to the dough.
Step 4
Let the dough rest on the kitchen countertop for 30 minutes to an hour. This is called autolyse and describes the first resting period of your sourdough loaf, during which you actively let the water and flour mixture combine thoroughly. The flour, especially whole grain, sometimes needs more time to soak the water; therefore, the autolyse comes in handy.
Autolyse is also said to be excellent for gluten development, giving bread the fluffy yet solid texture of a great bread loaf.
A note on autolyse:
Over time, I tried many different sourdough recipes, including and excluding the autolyse phase. All of my bread loaves turned out lovely, whether I put the dough on autolyse or not. Therefore, it’s up to you to let your dough rest without the sourdough starter.
Step 5
After letting your dough rest for about 30 minutes, it’s time to add the sourdough starter. Add 200g of active and bubbly sourdough starter to your dough and mix everything until it becomes smooth. You know you successfully blended everything when the dough is no longer sticky.
You can knead with your hands, a hand mixer, or a food processor. It’s up to you, but the result will be the same.
Step 6
This is the first time you should let your sourdough rest for fermentation. Therefore, leave the sourdough on the kitchen countertop at room temperature (20 – 24°C) without direct sunlight so that the fungi and bacteria in the sourdough starter can start to ferment the flour. Don’t forget to consistently cover the dough with a breathable cover so nothing can fall into it. I always use a simple kitchen cloth* on top of the bowl, and it works fine for me.
Step 7
After 30 minutes, you come back for the stretch and fold phase. It works like this: You take one end of your dough with your hands and stretch it vertically, gently stretching it around 30cm, and layer it on top of your dough. Next, rotate the bowl 90 degrees and repeat the procedure four times. Then, you leave the dough again to rest for 30 minutes.
Stretching and folding are crucial for the sourdough to develop a strong structure. This will result in a fluffy, airy, yet solid bread that holds its form—exactly how we all love bread!
Step 8
Repeat the stretch and fold phase for 2 to 3 hours, 4 to 6 times.
Tip: Observing your dough every time you return for stretching and folding is crucial. When the dough doubles in size and bubbles are visible on the surface, it is ready for bulk fermentation in the fridge.
There is no need to leave the dough longer on the countertop. Doing so will only result in a dough that quickly overferments and loses its form. Some doughs only need one to two hours to reach this stage; other times, you will need around three to four hours.
This has a lot to do with how old and robust your sourdough starter is and the room temperature—in the summertime, fermenting will go a lot quicker than in the winter. Also, humidity, aka if it’s raining outside, can influence the fermentation time of your dough.
Step 9
After the stretching and folding phase, when your sourdough is ready for bulk fermentation, it’s time to separate the dough into two equal loaves.
This will be the last time you touch and knead the dough before baking! Therefore, this is where you’ll work the two loaves of bread into smooth, round doughs with an even surface ready to be baked. The dough can then go directly into your banneton-proofing baskets for bulk fermentation.
Why I use banneton-proofing baskets
I always use banneton-proofing baskets, which are breathable and made from natural materials. Therefore, they are perfect for bulk fermentation. This way, no liquids can form overnight that could ruin your hard work. I also always cover the baskets with linen cloths.
You can also use flour to dust the sides of the banneton baskets to prevent your dough from sticking to the basket and leave the linen cloth aside. However, I did it this way at the beginning of my sourdough journey, but I highly encourage you to learn from my mistakes.
Four reasons I wouldn’t recommend using flour for your banneton baskets:
- Your dough can stick to the basket even if you use flour.
- You waste a lot of product because you need a lot of flour to prevent the dough from sticking to the sides of the baskets.
- If you use natural banneton proofing baskets, they will soon become very gross, and you’ll never get them clean again because the flour and the moist dough will react and could lead to mould after a few weeks.
- Your dough will be vastly covered in flour, which you must brush off or bake together. The crust of your bread loaf will have a floury taste and texture, and I prefer my bread crust to be very clean.
Unfortunately, I once had an incident where the dough stuck to the basket, even though I dusted plenty of flour on the sides to prevent this (I apparently forgot a spot, and my dough was a bit moister than expected). The dough was ruined. Of course, I baked it anyway, and it tasted delicious, but I would not recommend only using flour for preparing your banneton-proofing baskets.
Since I use linen cloths, I have never faced this problem again.
Prepare your dough for bulk fermentation like this:
- Work the bread loaves into round and even doughs – I never use flour on the countertop when working with sourdough (this is also one indicator for a very well-fermented sourdough if it doesn’t stick to the countertop).
- Prepare the banneton baskets.
- Cover them with linen cloths – I never use flour for the cloths because I never have problems removing the linen cloth effortlessly the next day from the dough.
- Place your dough inside the linen cloth-covered banneton baskets.
- Cover the baskets with either a plastic bag or a cloth – I recognised that plastic works better since the moist cannot get lost too quickly in the usually dry fridge – I always use shower caps – it’s very convenient and the environmentally gentlest way – you buy the shower caps once and can use them forever.
Step 10
Your two loaves of sourdough bread will be placed in the refrigerator for 14 to 20 hours for bulk fermentation. I like to do this in the fridge because it allows the dough to ferment slower, giving me more control over the fermentation process.
Tip: It’s best practice to do bulk fermentation in the fridge or a dark and cool place, especially for a sourdough beginner. This prevents your sourdough loaf from over-fermenting, resulting in a dough that is too liquid and without texture.
The more experience you gain, the more you can try bulk fermentation in a warmer place, like your countertop. But I still do bulk fermentation in the fridge—it’s convenient, and I don’t have to check on the dough since I know it will be perfect for baking after 14-20 hours.
Tip: The longer you bulk ferment your dough in the fridge, the easier it becomes digestible and the more prominent the signature sour taste of sourdough bread becomes.
When you’re gluten-sensitive
The bulk fermentation will help make the gluten more digestible, making it easier for people with gluten sensitivity (not celiac!) to digest the bread without experiencing unpleasant symptoms. Also, bulk fermentation allows the microorganisms to break down the shell of the whole grain, making the flour even more digestible. For me, this works just fine!
I’m very gluten-sensitive, ending with a bloated belly that hurts every time I eat something with gluten. But with my homemade sourdough bread, I never had any problems. If you as well struggle with symptoms of gluten sensitivity like bloating, bellyache, etc. I highly encourage you to increase the bulk fermentation time of your sourdough bread to at least 18 hours – better would be a total of 24 hours of bulk fermentation to make the flour highly digestible.
Step 11
Prepare some ice cubes for tomorrow. For each sourdough loaf, you will need two to three ice cubes (ca. 15g each). Depending on how many ice cubes you want to use, the crust of your bread will be softer or crispier.
Step 12
On the next day, after the bulk fermentation for about 15 hours, place your Dutch oven or bread oven inside the cold oven and preheat the oven to 230°C for about 30 minutes. You want your Dutch oven to be screaming hot for your sourdough bread to succeed.
I always use a bread oven whenever I bake sourdough bread. It is the perfect size and shape for a 1kg loaf, and it turns out fabulous every time. Also, cast iron can hold the heat better and for a longer time, which helps with getting a lovely crust.
Step 13
Now is the time to prepare everything you need to bake your sourdough bread:
- Take the ice cubes out of the freezer.
- Prepare the baking parchment or silicone bread sling for baking with a Dutch oven or a bread oven; otherwise, the bread can stick to the sides of the cast iron.
- Get your dough razor ready to score the dough to your liking.
Step 14
Take the sourdough still fermenting in the banneton basket out of the refrigerator. Put the banneton basket, including the sourdough, upside down on the baking parchment so the sourdough can fall out. Remove the linen cloth after you’ve removed the basket.
Now is the time for the scoring. Use a razor for the best results. In the past, I used my kitchen knife for the first few sourdough loaves I made. It works, too, but it gives a much less great-looking result than the razor.
Tip: Scoring is crucial for baking sourdough bread. If you skip this step, your bread will break uncontrollably during baking. It will still be delicious, and you can still eat it without any problems, but it won’t look as aesthetic as it does if you score the dough before you bake it.
Step 15
By now, you have your sourdough loaf on the baking parchment, scored the loaf to your liking, prepared your ice cubes, and the Dutch oven is still preheating in the oven.
Remove the preheated Dutch oven from the oven and leave the temperature at 230°C. Put your sourdough loaf with the baking parchment into the Dutch oven, and put two or three ice cubes UNDER the baking parchment so that they have no direct contact with the sourdough loaf but direct contact with the cast iron.
Immediately put the lid back on the Dutch oven since the ice cubes are starting to melt. Put the Dutch oven back into the oven and bake your sourdough bread for 30 minutes with the lid on at 230°C.
Step 16
After the first 30 minutes, reduce the temperature from 230°C to 200°C. Remove the lid from the Dutch oven. This will let the steam locked inside the Dutch oven evaporate, creating a lovely crust for your sourdough bread.
Bake the sourdough loaf for another 20 minutes without the lid covering it in the oven at 200°C.
Step 17
After the sourdough is baked for 20 minutes, remove the Dutch oven and let the finished sourdough bread cool for one to two hours on a cooling rack before cutting it. The cooling rack helps the sourdough release any steam and evaporate evenly, preventing the bread from getting soaked on the bottom.
Tip: It is crucial to wait for the bread loaf to cool down enough before you cut it open. Otherwise, if you slice it too early, the bread will release too much moisture and dry out on the inside.
Storage
You can store your sourdough bread in an airtight container for a few days, but this is how I prefer to handle my bread loaves:
After my sourdough bread had cooled enough, I immediately cut the whole loaf, using a bread knife to cut equal slices without smashing the bread, as can happen with a standard kitchen knife. The unique structure of a bread knife guarantees that you can effortlessly cut through the crust and the soft inside of the bread.
Also, using a bread knife to slice your bread is the safer option in your kitchen. You have a much better grip on the bread and can hardly slip off it, as it can happen quickly with a regular kitchen knife.
Then, I put all the bread slices in the freezer because I usually toast my bread. You can store it in the freezer for weeks without compromising quality. When you toast the bread slices or defrost them on the kitchen countertop for a few hours, you can always enjoy high-quality sourdough bread for breakfast, lunch, dinner, or snacks.